Wednesday, 27 August 2014

Richard III Visitor Centre, Leicester


Today myself and my partner took the opportunity to try out the new Richard III visitor centre in Leicester. It's quite easy to find being immediately opposite Leicester Cathedral. They've also moved the original statue of Richard from its old place in Castle Park to outside the centre where it can be more easily seen.
Tickets for the exhibition can be purchased online with allocated slots throughout the day. Probably a good idea, as it keeps a manageable amount of visitors within the centre and means folks aren't elbowing each other to get a view. First part of the exhibition is taken up by a replica throne room and the story of Richard III projected onto a video screen behind.
To the right was a gallery exhibit of Graham Turner's Medieval paintings, which I found to be really fantastic. You can view his work online here: http://www.studio88.co.uk/acatalog/medieval_prints.html
Going upstairs is where the centre really comes into its own. With a detailed account of Richard III's portrayal throughout history and literature, followed by the attempts to locate his remains. Anyone who's seen the recent TV documentaries will already be aware of the painstaking process investigators went through to find living relatives and source DNA matches. Towards the end we have a fantastic reconstruction of Richard's armour at Bosworth (done in white plastic, as some of the metal working techniques originally used have apparently been lost) and a skeletal reconstruction with descriptions of his wounds. Finally there's a lovely chapel like construction with a glass floor and the actual Greyfriars Abbey excavation beneath a glass floor with the bones outlined in light. At the back is an inscription taken from Richard III's 'Book of Hours Prayer' and a bouquet of White Roses.


Sunday, 24 August 2014

Battle of Bosworth - 15mm


Today saw the Club recreate The Battle of Bosworth in 15mm using Dave's nicely home crafted 'Blood and Glory' Rules. Chris was responsible for organizing the game and based it primarily on Glenn Foard and Anne Curry's book "Bosworth 1485: A Battlefield Rediscovered". As the title suggests it's based on some of the most up to date archeological evidence.

The opposing sides were arrayed with Richard III atop Ambion Hill, Norfolk to the front and Northumberland in the rearward. The Yorkist forces faced to advance down Fenn Lane, off the hill and with the notorious marsh on their left. Henry Tudor and his men were placed with their right flank below Crown Hill and anchoring it to the tip of the marsh. On the left were the Welsh with Rhys Ap Thomas and a French force. The Stanley's were situated in Dadlington and to the back and rear of Henry's extreme right on top of Crown Hill. Both Paul and Rich were playing the Stanley's and naturally were reflecting the part by not yet revealing their allegiance.

Myself, Lawrence and Barry decided on a Yorkist advance that would make use of our numerical strength and hopefully envelope Henry's left wing. Barry as Norfolk pushed the vanguard forward as Gary (Henry) sent Chris and the Welshmen to intercept. In this sense they used their right wing as a pivot to sweep across Fenn Lane and block us (see below).


The Stanley's meanwhile started to shift their men across Crown Hill, but it still wasn't clear if they were intending to engage either side. Nevertheless, as the Yorkists moved to confront the Lancastrian threat, it was deemed necessary to use Northumberland's rearward units to cover a possible threat from them if they decided to cross the marsh.

By this time Norfolk had crashed into the Welsh with some ferocity, and whereas the Yorkists initially received a bloody nose due to some excellent dice rolling from Chris, it was when Norfolk's men started to charge in with their Men at Arms that things looked shaky for the Lancastrians. Added to this was the archery duel now developing between Richard III's main battle and him swinging his cavalry into a gap in the lines ready to punish the Lancastrian crossbowmen.

The Stanley's at this stage started to arrange themselves into a formation that looked ready to attack the Yorkist by way of lining their archers to fire over the marsh. By this time the tension was at breaking point and Northumberland (Lawrence) took the opportunity to pre-empt the strike by loosing his bowmen at them. This encouraged plenty of return fire, as the archers shot back and forth the casualties mounted on both sides. The Lancastrian left flank then started to disintegrate as morale checks left the Welsh running for home and Norfolk's men pushed onward. About this time the Bodyguard of Richard III led by a gallant Earl of Surrey burst into the Lancastrian centre, grinding down two units before getting embroiled in a serious set-to with Henry's own mounted Men at Arms. Luckily both units bounced back after more casualties and withdrew to regroup. However, it came within a sword tip of Henry's own person (history repeating itself?) and Gary decided that the Lancastrian forces would find it hard to carry on and so began to fall back on Crown Hill.


Monday, 18 August 2014

Imperial War Museum Refurbishment

Many folks have probably noticed in the news that the Imperial War Museum in London has undergone a big refurbishment recently. Myself and my partner had the fortunate opportunity to drop down there last weekend (actually she went off to the Sherlock Holmes Museum and Disney Store with a mate, whilst me and my pal Doug went to the IWM!). Anyway, I was immediately struck by how extensive the revamp is. The entrance area is much more light and airy, whilst each individual exhibition has been expanded. The WW1 exhibit was rammed out with a long line of folks stretching round the main hall. I was probably the most impressed by the area now dedicated to the Holocaust. This part of the Museum now exerts the kind of powerful impact the subject deserves. Unfortunately I didn't realise that the area didn't allow photos until I stepped out, but I expect it's primarily to prevent the kind of inappropriate silly tourist photos that people take on occasion. I'd hope mine below at least influence more intelligent and serious people to visit the exhibition.


Tuesday, 12 August 2014

28mm AWI - Battle of Germantown

Last Sunday the Club decided to revisit the bloody fields of the American War of Independence using the Musket and Tomahawk rules. The Battle of Germantown saw an attempt by the American forces spring a surprise attack on the British Camp through thick fog. In the game we reduced the range of spotting down to 12" to compensate for the weather conditions. The British would need to use their pickets to alert the Camp and hope the Americans wouldn't get too much of a march across the table before the Brits could rouse their forces. Other than pickets of Light Infantry they'd only got a regiment of Regular troops and one regiment of horse, so using these to hold back the tide would be crucial. Myself and Ian played the British and Hessians while Simon and Lawrence were the Americans.

Muskets and Tomahawks being a card turn based game, unfortunately the Americans got their fair share of good luck and pushed aside the British pickets. Our regulars decided not to mimic history and instead of holding up in Chew House, they withdrew and formed line across the road leaving the town. After only one desultory volley the Americans charged into them scattering all before their onslaught. The British horse only did little better by rushing across to engage an enemy unit which they severely mauled, but ultimately had to give way to sheer numbers pushing down the road. It took some tense turns thereafter as the messengers finally issued the alert to the British Commander - in fact the Americans were only a few yards away before the Hessians and Highland troops managed a firing line and blasted their first units in view.

The whole British end of the field became a bloodied mangled mess of hand to hand fighting, especially as the British Rangers were reluctant to yield a small wood on the right flank which was causing a nuisance to the American advance. In the final moments George Washington himself had to order a unit of Elite troops into the undergrowth to finish the job, leaving two American Provincial units mulling their heavy casualties.

In conclusion, another fun game with plenty of "edge of your seat" moments. I think if the British had been successful in raising an alarm a turn or so earlier, so they could properly organise their formations, the day would have been theirs.


Sunday, 20 July 2014

35mm Jugula Gladiators


This is the first set of the Gripping Beast 35mm Gladiators for their Jugula game. I bought them from Sheffield Triples earlier this year along with the ruleset, but due to other more pressing painting duties they'd been on the shelf since then. Given the size they're great to paint (no multiple batch painted uniforms here) and you can just sit and concentrate on skin shades and other detail. The other advantage is the assortment of helmets and weapons that come with the GB sets, creating the options for lots of dynamic poses. As there's four gladiators that make up a team I've another set currently sitting on the side ready for undercoating - after that it'll be time to step into the Arena! Yikes!

Sunday, 13 July 2014

AWI 28mm Game - Muskets and Tomahawks


The photos above (kindly taken by Mark, as my camera phone seemed to have malfunctioned) are from a recent Sunday club game using the skirmish ruleset 'Muskets and Tomahawks'. We decided some weeks ago to try out an AWI scenario, because the rules lent themselves quite nicely to that period. It also gave myself and Ian a chance to use our newly painted Front Rank British regulars and Perry's AWI Continental Infantry. Also included were lots of militia types, some nicely painted Hessians, a few rangers and lots of Indians!

The point of the scenario was for each opposing force to capture the majority (or all) the 5 objectives - two towns, an Indian village and a fort in each corner of the board with a watchtower in the centre.

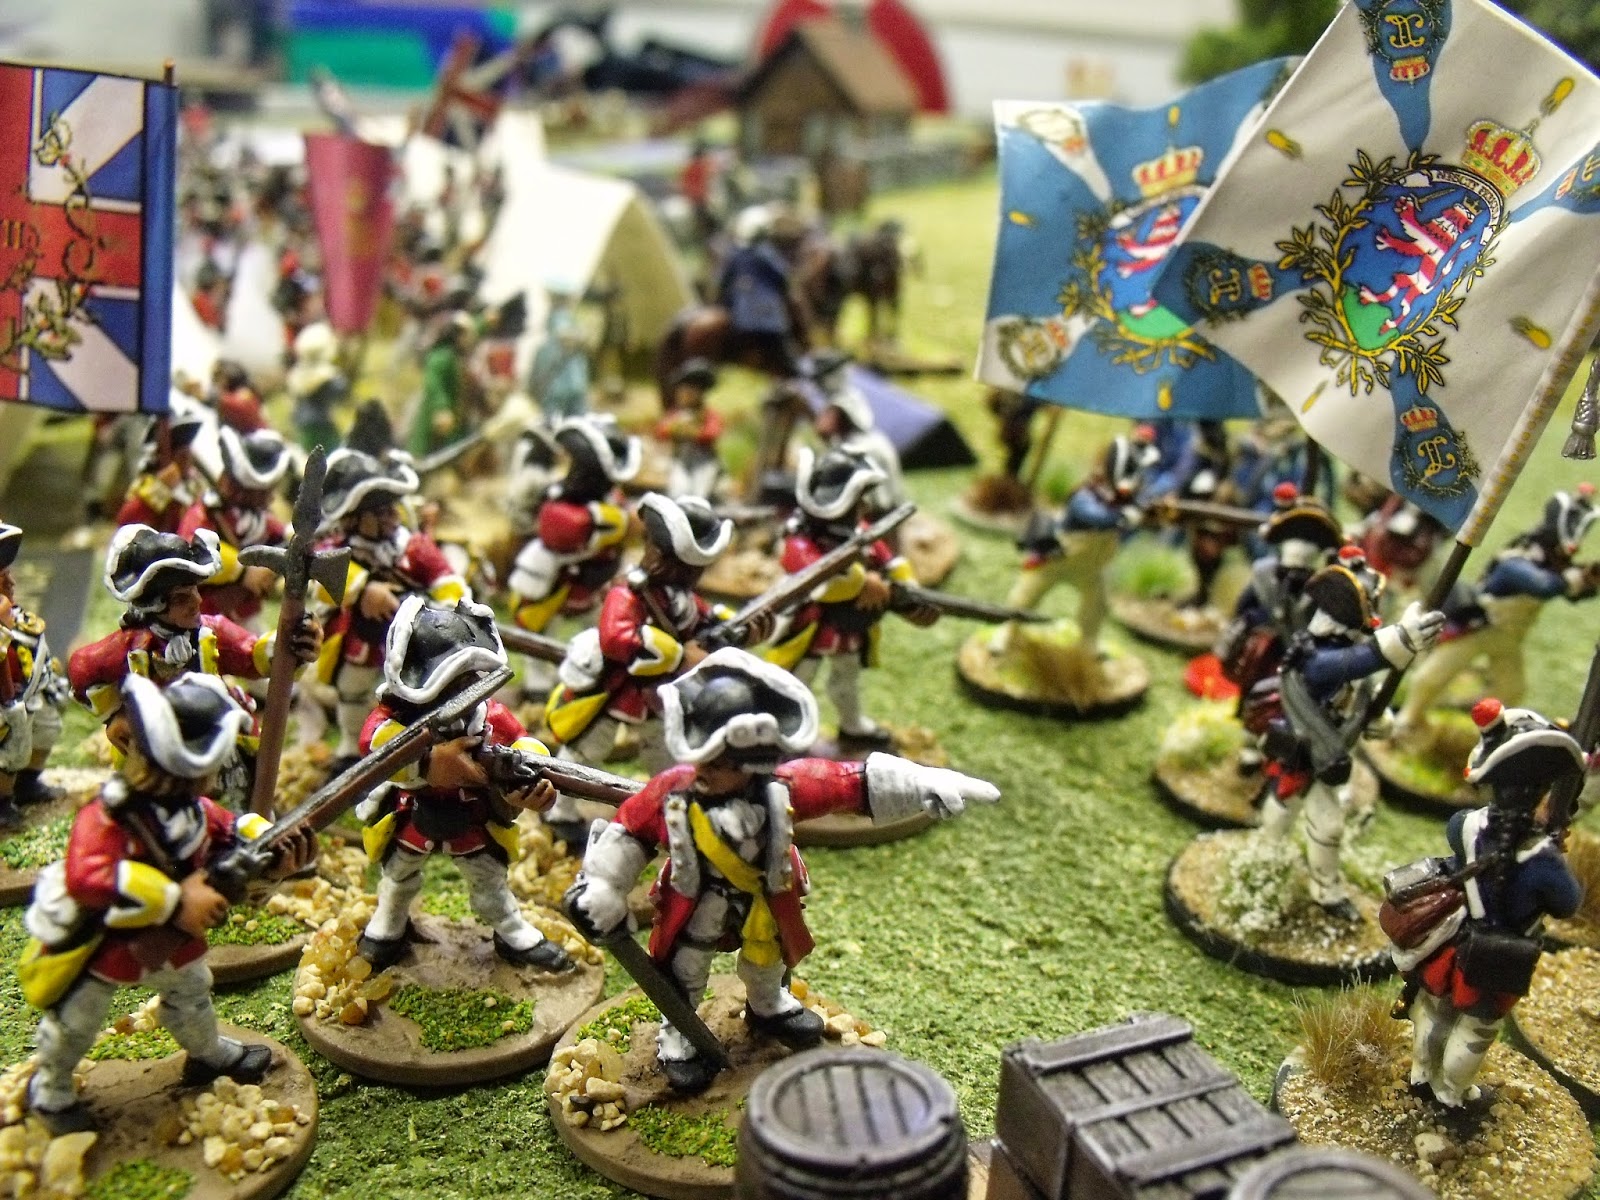
The first moves were tentative and mainly relied on spotting. Nevertheless, as soon as each army had identified the others units it was a mad dash to secure the objectives. Dave on my team had the Hessians in the middle and headed straight against Lawrence's American Militia who were advancing on the watchtower. I had the unfortunate task of attempting to take the Indian village on the right flank, and soon ran up against Marcus' three regiments of Continentals...all in firing line!! (VERY nasty indeed!!). My only option was to try and infiltrate rangers and Indians into a cornfield, and from this light cover gradually wear his forces down until my British Regulars could charge in to finish the job. Naturally this didn't go to plan, and despite putting a dint in a unit or two of Marcus' units my rangers definitely came off the worst. On the left flank Ian's British units were getting into a tangle with Simon's troops that looked to be locked in a gruesome stalemate.

Over in the centre again and Dave's troops had made some headway by securing a small forest and began to harass the enemy columns in that area. However, the watchtower was providing a tough nut as Mark's forces (again in firing line and nicely positioned on a small hillock) managed to turn anywhere East of the building into a killing ground. At this juncture I'd like to point out my only successful deed for the day, when I'd sent a unit of bloodthirsty Indians to support the defence of the aforementioned woods. Basically after a few scattered shots from my natives it was considered worth risking a rush attack from the treeline, and into the advancing American Militia unit. A risk that paid off with the American's paying dearly for their folly. Had it ended there would have been good enough, but with a 2" optional move after melee victory the Indians bounced aggressively into a second American Unit close by and (winning that) also attacked a gun battery to follow up. Much hilarity was emitted from the British side, as the Americans stood on in dismay. All good things come to an end nevertheless as the last remaining Indian Brave was cut down waving his tomahawk at the second wave of oncoming Americans.

The latter point proved the conclusion of the affair, as the American's by this time had decimated the British units so that numerically they were in the ascendancy. More and more British units were breaking and running as the repeated morale checks took their toll.

In finishing then, I'd say it was a fun game, with lots of character, an atmosphere of adventure (and very bloody). It also showed you could play a fair sized game with a good simple skirmish ruleset.

Friday, 4 July 2014

28mm Knights Hospitaller


These are Conquest Games Norman Knights (plastics). I've added some cloaks using Green Stuff after feeling somewhat inspired by David Thewlis' character in the film 'Kingdom of Heaven' (historically awful but some nice scenes). I intended to paint them in quite dull colours that would reflect their modest existence, as compared to their Knights Templar compatriots. I read somewhere in the Asbridge books that during the Crusades many of the military orders looked incredibly filthy with long beards and filthy clothing, which was a reflection of the rigors of the campaigns they'd embarked upon.

I'm still excited for the upcoming 'Crescent and Cross' game from Tomahawk Studios, as the previous games like Saga and Muskets and Tomahawks have been great fun to play. The Crusades also provide loads of opportunities for small, very bloody, skirmish actions which would be well suited for these rules. Maybe a foraging expedition taken on by a group of knights and followers falling foul of an Arab Emir and his band of mounted archers, or the search for a holy relic or two!